Every small business wants a professional, responsive, SEO-ready website that doesn’t break the bank. WordPress is ideal for that: flexible, easy to work with, full of plugins and themes—and Fiverr gives access to many talented developers around the world. But sorting through hundreds of gigs, finding someone reliable, getting fair prices, ensuring quality: that takes care. In this guide, I’ll share everything you need to know to hire affordable WordPress developers on Fiverr, understand typical pricing, choose wisely, avoid common pitfalls, and ensure you get a site that performs—on speed, security, SEO, and design.
Why Choose a WordPress Developer from Fiverr for Your Small Business
Small businesses often operate with lean budgets. Hiring a full local agency or in-house team can cost thousands. Fiverr allows you to:
Access a large global pool of WordPress freelancers, many who specialize in site setup, theme customization, plugin development, performance optimization, maintenance, etc.
Compare portfolios, reviews, prices, and delivery times easily.
Scale costs: pay less for minor fixes or basic themes; more if you need complex custom work.
Find someone whose working hours, language, and style match yours. That flexibility helps for communication and scheduling.
But affordable doesn’t mean low quality. You just need to know what to look for and what questions to ask.
What “Affordable” Means: Typical Price Ranges on Fiverr
Understanding what is reasonable for WordPress work on Fiverr helps you budget right and avoid overpaying. Based on recent data:
Service Type
Approximate Fiverr Price Range
What You Should Expect in That Price
Simple WordPress site setup or configuration
US$ 20-US$ 80
Basic theme install, setting up pages, minor plugin configuration. May use free themes.
Prices vary a lot depending on several things. Even when someone offers a low gig, price alone doesn’t tell you whether it meets your needs. Here are what influence cost:
Complexity of design and features. Are you using a free theme? A premium one? Do you need eCommerce, membership, multilingual support, advanced forms, custom post types, custom plugin work?
Responsive/mobile design. A site that looks good on phones and tablets takes more work than one that’s simply desktop-friendly.
SEO readiness. Basic on-page SEO (proper headings, alt tags, meta descriptions) plus speed and performance optimization improve your site’s ranking. If it’s included, expect higher costs.
Speed & performance. Fast page load, optimized images, caching, minimized CSS/JS—they all require skills. These add to cost.
Security & maintenance. SSL setup, plugin/theme updates, backups, protection against hacks. Ongoing maintenance may be monthly or per job.
Experience & reputation of the developer. A Fiverr seller with 5-star reviews, strong portfolio, and many completed orders will charge more than someone just starting.
Delivery time. If you want something in 24 hours or within a few days, expect to pay more for a “rush job.” Fiverr allows gigs with faster delivery for extra fees.
Geographic location. Developers in different countries have different cost expectations; currency and cost of living affect what “affordable” means.
What You Should Do Before Hiring: Checklist
To get a good WordPress developer for an affordable price, do your homework. Here are what you should check:
Look at portfolio examples: view live sites they built, test the responsiveness, speed, design. Portfolios give you real proof.
Read reviews and feedback carefully. Not just the star rating, but what clients say: did they get what was promised? Was communication good? Did revisions happen on time?
Ask about communication channels & language: make sure you can talk clearly. Misunderstandings in requirements cost more later.
Clarify deliverables: How many pages? What theme? Free or premium theme? Will they handle basic SEO setup? Mobile responsive? Number of revisions?
Request speed & security measures: ask if they will install caching, use SSL, optimize images, ensure the site is protected from common vulnerabilities.
Ask for examples of SEO-optimized sites or how they handle SEO. A beautiful site is useless if no one finds it in search engines.
Confirm maintenance and support: after launch, who handles updates and bug fixes, and what will cost extra?
Here’s the strategy to discover quality, affordable developers who match your small-business needs:
Use targeted search terms in Fiverr like “affordable WordPress developer,” “WordPress site for small business,” “WordPress maintenance,” “cheap WordPress theme customization,” “WordPress speed optimization.” These long-tail keywords usually return gigs that are more specific and often more affordable.
Filter by seller level, reviews, and delivery time. Sellers with higher levels (Level 2, Top Rated Seller) are more reliable. Even new sellers with good ratings can be great but demand more careful evaluation.
Compare multiple gigs: check what is included vs what isn’t. Sometimes a gig looks cheap but doesn’t include mobile optimization, or backups, or a real license for premium themes.
Look at the gig extras. Sometimes the basic price is low, but extras (like mobile responsiveness, fast delivery, additional pages) can double or triple the cost. Know ahead what you need.
Don’t be lured only by price. A cheap site that crashes, loads slowly, or isn’t secure will cost more (in lost customers, fix-ups) later on.
Common Mistakes That End up Costing More
Small business owners often make avoidable errors. Here are what to avoid:
Not checking reviews or portfolio: you may get someone who disappears or delivers poor quality.
Vague requirements: “Make site look nice” isn’t useful. Better: “I need a homepage, blog page, contact form, mobile responsive, speed under 3 seconds, SEO basic.”
Ignoring performance: slow sites lose visitors. If speed isn’t built in, you’ll need to pay later for optimization.
Skipping security & backups: if your site gets hacked or you lose data, fixing is often costlier than paying up front for security.
Choosing someone only because they’re the cheapest: worst case, you’ll get a junk theme, poor code, no support, or hidden charges.
Realistic Budget Planning for Small Businesses
If you’re a small business owner with limited funds, here’s a sample budget plan depending on what you need:
Basic site (about 3-5 pages, blog, contact form): expect to spend US$ 60-US$ 150 if using a good theme, with responsive design, basic SEO and speed optimization.
Standard business website (5-10 pages, blog, maybe eCommerce module or booking, custom design touches): expect US$ 150-US$ 300.
Complex site (custom theme, eCommerce, membership, multilingual, advanced plugins): expect US$ 300-US$ 600+, depending on the work. Sometimes significantly more.
Then add maybe US$ 20-US$ 80+ for security, backups, performance optimization, ongoing maintenance. Being realistic helps you avoid sticker-shock later.
Sample Fiverr Sellers / Gigs: What to Browse For
Here’s what a good gig might include vs what you might want to avoid:
Good gig includes:
Clear illustrations of their past WordPress websites or theme customizations (live links).
Responsiveness, mobile usability showcased.
Details: number of pages included, number of revisions, inclusions of SEO setup, site speed optimization, plugin configuration.
Gig that says “Website setup” but doesn’t mention mobile responsive, speed, or SEO.
No portfolio or only low-quality screenshots.
Unclear deliverables or vague timelines (just “within a few days” without specifics).
“Custom price on request” only without giving any base rate—sometimes okay, but often means hidden costs.
Negotiation & Communication Tips
To get high value, good design, on time, for affordable price:
Write a clear brief. Include mockups or references (websites you like), brand colors, logo if you have it, content ready or not. The clearer you are, the less back and forth, cheaper the cost.
Ask about theme licensing: if they use a premium theme, you need a license. Sometimes the seller includes the cost, sometimes you provide.
Confirm responsiveness across devices and browsers.
Ask about revision policy: how many revisions are included, how much time (24, 48 hours?).
Set milestones. For bigger jobs, ask for partial deliveries (homepage first, then inner pages) so you can check and give feedback early.
Ensure you retain ownership: of content, domain, design, source files.
After Launch: What to Do to Keep Up
Don’t think the job ends when the site goes live. Small businesses must maintain and update:
Keep WordPress, theme, and plugins updated to patch security vulnerabilities.
Regular backups: daily, weekly, or monthly depending on how often content changes.
Monitor site speed and performance—if you add large images, new plugins, etc., these can slow down your site.
Ensure SEO content continues (blogs, updating keywords, meta descriptions) so you stay visible.
Check for broken links, mobile usability, and user feedback.
What Makes the Smart, Affordable Choice
For small businesses, “affordable” means striking a balance: you don’t need all the bells and whistles; you need essential features done well. That usually means:
A clean, responsive design that works well on phones and tablets.
Basic SEO setup so people can find you.
Solid performance so visitors don’t bounce.
Security and backups to prevent disaster.
Clear communication and reliable delivery.
If your Fiverr developer offers those, at a price that matches the ranges above, you’ll have made a smart investment.
Final Thoughts
Hiring an affordable WordPress developer on Fiverr can be a game changer for small businesses. You can get a professional, functional, beautiful, SEO-optimized website without draining your budget. The key is to know your requirements, do your research, communicate clearly, and choose someone who delivers not just what they promise but what your business needs.When you follow these steps, you’ll avoid costly mistakes, get better performance, higher conversion, and a site that grows with your business. Take the time to pick the right person, and your WordPress website becomes not just a cost—but an asset.
Hey there! If you’re knee-deep in building a WordPress website and feeling a bit lost with Elementor, you’re not alone. Elementor is an awesome drag-and-drop tool that lets you create beautiful pages without coding. But let’s be real getting that pro-level look, super-fast loading times, and mobile-friendly design? That’s where the magic of hiring an expert comes in.
In this guide, I’ll walk you through everything you need to know about finding the best Fiverr Elementor experts in 2025. We’ll cover why you should hire one, how Fiverr makes it easy, a hand-picked list of top freelancers (based on ratings, reviews, and real results), step-by-step hiring tips, costs, common pitfalls, and more. By the end, you’ll be ready to pick a pro who turns your vision into a site that wows visitors and boosts your business.
Whether you’re launching a blog, eCommerce store, or landing page, these top Elementor experts on Fiverr can save you hours of frustration. Let’s dive in! (And if you’re just starting out, check our beginner’s guide to Elementor for quick tips.)
Why You Need an Elementor Expert (Even If You Love DIY)
Picture this: You’ve spent days tweaking Elementor widgets, but your site feels clunky on phones, loads like molasses, or just doesn’t pop. Sound familiar? That’s because Elementor is powerful, but mastering its advanced features like custom templates, SEO tweaks, and plugin integrations takes real skill.
Hiring a Fiverr Elementor expert isn’t about giving up control. It’s about getting expert help to:
Build custom headers, footers, and layouts that match your brand.
Make your site lightning-fast and SEO-ready for Google.
Fix bugs, speed up performance, and ensure it works with tools like WooCommerce or email plugins.
Create responsive designs that look great on any device.
The best part? These pros handle the techy stuff so you can focus on what you do best growing your business. And with Fiverr’s affordable gigs, it’s cheaper than a local agency but just as good (or better!). For more on speeding up your site, see our Elementor performance tips.
Why Fiverr Stands Out for Finding Top Elementor Freelancers
Fiverr isn’t just another freelance site, it’s like a global mall for talent. With thousands of Elementor experts for hire, you can find someone who speaks your language, fits your budget, and delivers fast. No endless emails or vague quotes.
Here’s what makes Fiverr the #1 spot for best Fiverr Elementor experts:
Huge Talent Pool: Pros from everywhere, specializing in everything from simple fixes to full-site builds.
Real Reviews: See honest feedback from past clients ratings, portfolios, and success stories.
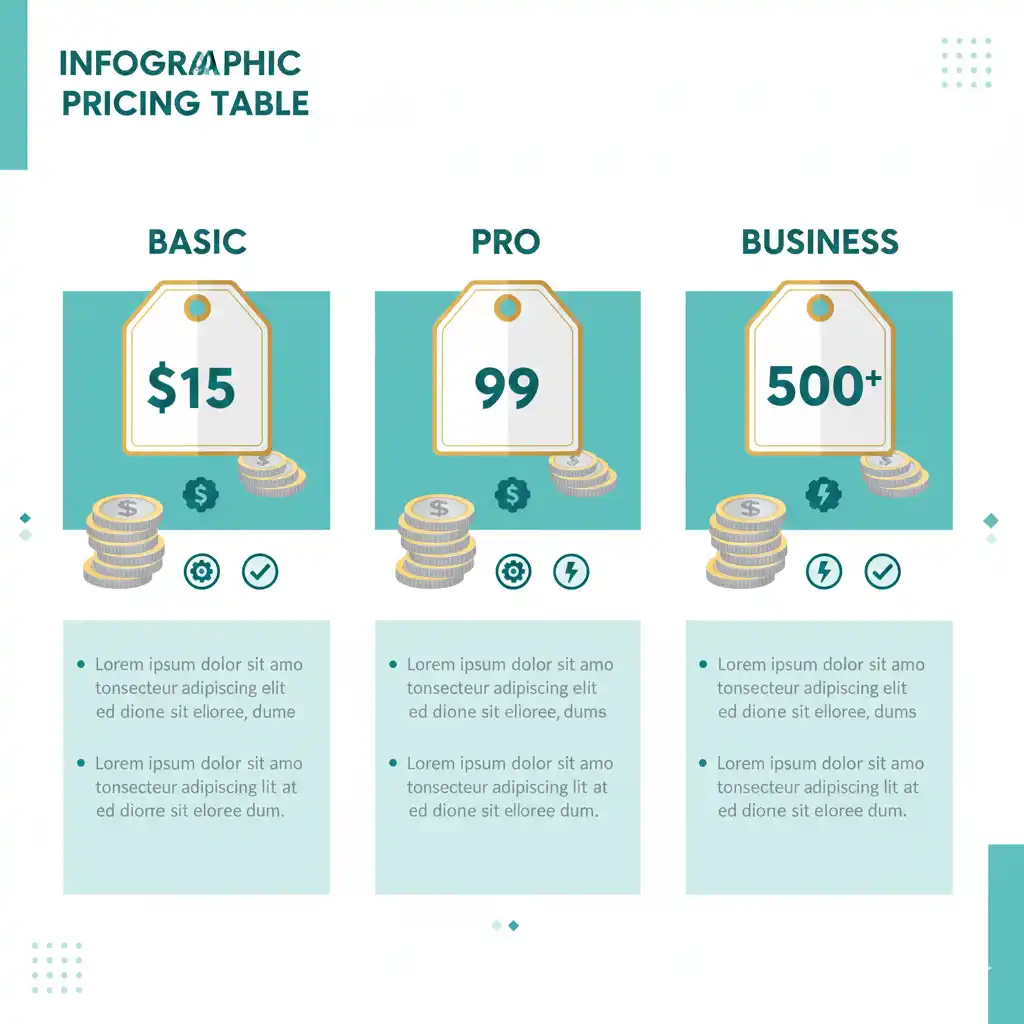
Budget-Friendly: Gigs start at $15, up to premium packages over $500.
Safe & Simple: Pay upfront, but funds release only when you’re happy. Plus, quick chat for questions.
Speedy Delivery: Many offer 1-3 day turnarounds for urgent jobs.
In 2025, with AI tools popping up everywhere, Fiverr’s human experts still win for custom, creative work. Skip the robots – go for real results. (P.S. If Divi is more your vibe, don’t miss our top Fiverr Divi experts list.)
Our Top 10 Picks: The Best Fiverr Elementor Experts in 2025
We scoured Fiverr’s top gigs to bring you this curated list of top-rated Elementor experts. These freelancers have killer ratings (4.9+ stars), tons of reviews, and proven portfolios. Prices are starting points – chat for custom quotes. (Pro tip: Look for “Top Rated” or “Level 2” badges for extra reliability.)
Ashwini S – 5.0 stars (101 reviews), from $35, 1-3 days delivery.
A go-to for responsive WordPress designs. Specializes in Elementor Pro customizations and WooCommerce setups. Clients rave about her clean, modern layouts that load in under 2 seconds.
Alinam1 – 5.0 stars (108 reviews), from $25, fast turnaround.
Perfect for budget-friendly landing pages. She’s a wizard at mobile optimization and plugin fixes. One reviewer said, “Turned my messy site into a pro masterpiece overnight!”
Zara – 5.0 stars (1,000+ reviews), from $535 for full sites.
Premium pick for eCommerce pros. Builds SEO-optimized stores with Elementor and integrates everything from payments to pop-ups. Her portfolios show stunning, conversion-focused designs.
Ishak – 5.0 stars (92 reviews), from $15 for quick fixes.
Ideal for beginners needing bug busting or speed tweaks. Focuses on Elementor themes and contact forms. Super responsive – replies in hours!
Sampa Biswas – 5.0 stars (249 reviews), from $80, video consults available.
Top for creative redesigns. Loves crafting unique Elementor templates with animations. Clients love her eye for detail and unlimited revisions option.
Specializes in PSD/Figma to Elementor. Builds fast, secure sites with top-notch responsiveness. His communication is spot-on – no guesswork.
ServeTech G – 4.9 stars (8 reviews, but rising fast), from $100, Top Rated.
Go for advanced WooCommerce + Elementor setups. Offers performance audits and SEO basics. Early clients call it “transformative.”
Kashif – 5.0 stars (high-volume seller), from $25.
Quick Elementor designs for blogs and portfolios. Focuses on user-friendly, editable sites you can tweak later.
Sanan Khan – 4.9+ stars, from $30.
All-around pro for Elementor websites. Excels in theme customizations and integrations. Affordable and reliable for repeat clients.
These best Fiverr Elementor experts were chosen for their high ratings, quick delivery, and client love. Search their usernames on Fiverr to see full portfolios!
Step-by-Step: How to Hire Your Perfect Elementor Expert on Fiverr
Finding the right pro is simpler than you think. Follow these easy steps to land a top Elementor freelancer without the hassle.
Step 1: Start Your Search Smart
Head to Fiverr.com and type “Elementor expert” or “best Fiverr Elementor experts”. Filter by:
Skip anyone without 50+ reviews experience matters.
Step 3: Read the Gig Details Like a Pro
Good gigs spell out:
What’s included (e.g., revisions, source files).
Extras like SEO or WooCommerce ($20-50 add-ons).
Your role (e.g., provide logos or content).
Clear descriptions = fewer surprises.
Step 4: Chat Before You Commit
Message 2-3 favorites: “Hi! I need a 5-page site with Elementor for my blog. Can you do a mobile-first design under $200?”
Ask about timelines, tools (Elementor Pro?), and post-delivery support. Quick replies? Green flag!
Step 5: Order and Track Progress
Pick your fave, pay securely, and use Fiverr’s dashboard to share files. Approve milestones easy peasy.
Key Qualities of the Best Fiverr Elementor Experts
Not every gig is a winner. Spot the stars by these must-haves:
Elementor Pro Mastery: For advanced widgets and themes.
Speed & SEO Smarts: They optimize images and code for top Google ranks.
Responsive Everything: Tests on phones, tablets, desktops.
Great Communicator: Daily updates, no ghosting.
Solid Reviews: 4.9+ stars from 100+ clients.
Bonus: Look for Elementor-certified badges instant trust boost. (Want to learn more about Elementor Pro features? We’ve got a full breakdown.)
How Much Will It Cost? Real Pricing for 2025
Prices vary by project size, but here’s a quick breakdown based on top gigs:
Service Type
Average Price Range
Typical Delivery Time
Quick Bug Fix or Tweak
$15 – $50
1 day
Single Landing Page
$25 – $100
1-3 days
Full 5-Page Website
$150 – $400
5-10 days
WooCommerce Store Setup
$100 – $300
3-7 days
Premium Custom Build
$500+
10-15 days
Tip: Negotiate bundles, many Elementor experts on Fiverr throw in free speed tests. Start low, but don’t skimp on quality. For budgeting help, see our WordPress cost guide.
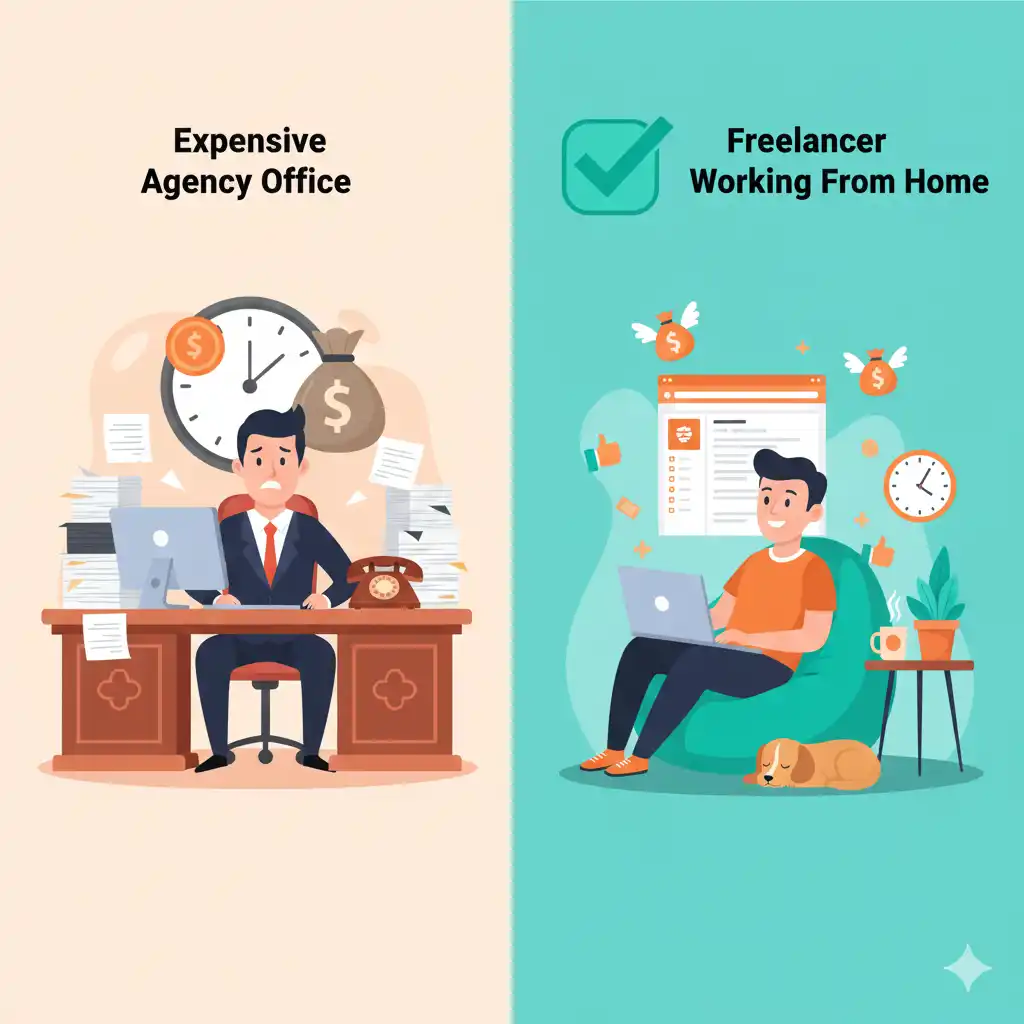
Fiverr Elementor Experts vs. Old-School Web Designers
Why go freelance over a fancy agency? Check this out:
Aspect
Fiverr Elementor Expert
Traditional Designer/Agency
Cost
$25-$500, flexible
$1,000-$5,000+ upfront
Speed
Days to a week
Weeks to months
Communication
Instant chat
Emails/calls
Revisions
2-5 included
Extra fees
Access to Talent
Global, 24/7
Local only
Fiverr wins for small biz owners – pro work, minus the headache.
5 Common Mistakes to Dodge When Hiring
I’ve seen it all: Rushed hires leading to redo’s. Avoid these:
Picking by Price Alone: $10 gigs often mean rushed, generic work.
No Pre-Chat: Assumptions lead to mismatches, always message first.
Vague Briefs: Share mood boards or examples, not just “make it pretty.”
Ignoring Reviews: Fake ones exist; focus on detailed, recent feedback.
Forgetting Mobile: Ask for device tests upfront.
Learn from others’ oops, your site’s too important! (Pro tip: Use our freelance hiring checklist to stay on track.)
Pro Tips to Maximize Your Elementor Project
Want stellar results? Try these:
Prep Your Brief: List pages, colors, and inspo sites.
Share Access Safely: Use Fiverr’s secure file sharing for logins.
Request Editables: Get Elementor files so you can update later.
Test Everything: Demand a final walkthrough and speed report.
Build a Relationship: Top clients get priority on future gigs.
Solo Fiverr Elementor experts rock for quick projects under $500. Agencies shine for big teams needing ongoing support. Start freelance scale if needed. (Compare more in our freelance vs agency post.)
Real Talk: A Success Story That’ll Inspire You
Take Sarah, a coffee shop owner in NYC. Her DIY site was cute but slow. She hired Ishak (from our list) for $80. In 2 days, she had a zippy, menu-packed site with online ordering. Traffic jumped 150%, and orders doubled. “Fiverr changed my game,” she says. Yours next?
FAQ: Your Burning Questions on Fiverr Elementor Experts
Q: How do I know if an expert is legit?
A: Check 100+ reviews, portfolios, and badges. Chat to vibe-check.
Q: Can they handle my custom theme?
A: Yes, most top pros customize anything with Elementor Pro.
Q: What’s the refund policy?
A: Fiverr holds payment till you’re thrilled; easy disputes if not.
Q: How long for a full site in 2025?
A: 5-10 days for most, faster with express.
Q: Do they optimize for SEO?
A: The best ones do – ask upfront for keyword-friendly structures. (More on SEO for Elementor sites.)
Conclusion
There you have it, your roadmap to the best Fiverr Elementor experts in 2025. Don’t let a so-so site hold you back. Pick from our top 10, follow the steps, and watch your online presence soar.
Ready to start? Head to Fiverr, search “Elementor expert,” and message your fave today. Got questions? Drop a comment below. I’d love to help! Or explore more WordPress resources here on the blog.
This guide is updated for November 2025 trends. Prices and availability may vary. Affiliate disclosure: Some links are affiliates, and we may earn a commission at no extra cost to you.
The Divi Theme is one of the most popular WordPress builders, loved for its flexibility and drag-and-drop features. But sometimes, you may need advanced customization to achieve the exact look and functionality you want. Whether it’s creating a unique header, improving mobile responsiveness, or adding custom modules, hiring an expert saves time and ensures professional results.
That’s where Fiverr gigs for Divi customization come in. Fiverr connects you with skilled Divi developers who can handle everything from minor tweaks to complete redesigns—often at very affordable prices. In this guide, we’ll explore the best Fiverr gigs for Divi customization so you can transform your website with ease.
Why Hire a Divi Expert on Fiverr?
Affordable services: Fiverr offers Divi experts at prices suitable for all budgets. Quick turnaround: Many freelancers deliver results within 24–48 hours. Wide expertise: From custom headers and footers to advanced CSS tweaks, you’ll find specialists for every need. Risk-free: Fiverr includes ratings, reviews, and secure payments, so you know you’re working with trusted professionals.
Many websites look great on desktop but fall apart on mobile. Fiverr gigs focused on Divi responsive fixes ensure your site looks perfect across all devices.
3. Speed Optimization for Divi
Divi sites sometimes slow down due to heavy layouts. Fiverr specialists can optimize your Divi site’s speed by compressing images, minimizing CSS/JS, and configuring caching.
4. Custom Divi Modules and CSS Styling
Want a feature Divi doesn’t offer by default? Experts on Fiverr can create custom Divi modulesor apply advanced CSS styling to bring your vision to life.
For businesses ready for a makeover, Fiverr professionals offer full Divi website redesigns. They’ll rebuild your pages with fresh layouts, animations, and modern styles.
7. Troubleshooting and Bug Fixes
From plugin conflicts to theme glitches, Fiverr gigs specializing in Divi troubleshooting can quickly identify and fix issues so your site runs smoothly.
Conclusion
The best Fiverr gigs for Divi customization make it easy to take your WordPress website to the next level without spending thousands on agencies. Whether you need custom layouts, speed optimization, or full redesigns, Fiverr offers a wide pool of experienced Divi developers ready to help.
By investing in the right expert, you’ll save time, avoid technical headaches, and end up with a site that’s both professional and user-friendly.Explore Fiverr today, find the perfect Divi expert, and start customizing your website with confidence.
Sometimes when you update your WordPress website—whether it’s a theme, plugin, or even WordPress itself—the site goes into what’s called “maintenance mode.” This is a normal process that helps prevent issues while the update is happening. However, things don’t always go as planned. If the update is interrupted or fails midway, your website might get stuck on a message like: “Briefly unavailable for scheduled maintenance. Check back in a minute.”
This message can be confusing and frustrating, especially if you don’t know what caused it or how to remove it. The good news is that this is a very common issue and there’s a quick fix that anyone can do—even if you’re not a tech expert. In this guide, I’ll walk you through the simple steps to get your WordPress site back up and running in just a few minutes.
Step 1: Access Your Website’s File Manager
To begin, you’ll need access to your website’s File Manager, which you can find in your hosting control panel.
If you’re using Hostinger, log in to your hosting account and go to hPanel. From there, click on File Manager.
If you’re using another hosting provider like Bluehost, GoDaddy, or SiteGround, you’ll likely be using cPanel.
Log in to your hosting dashboard.
Search for and open File Manager.
The goal is to open the tool that lets you view and manage your website’s files.
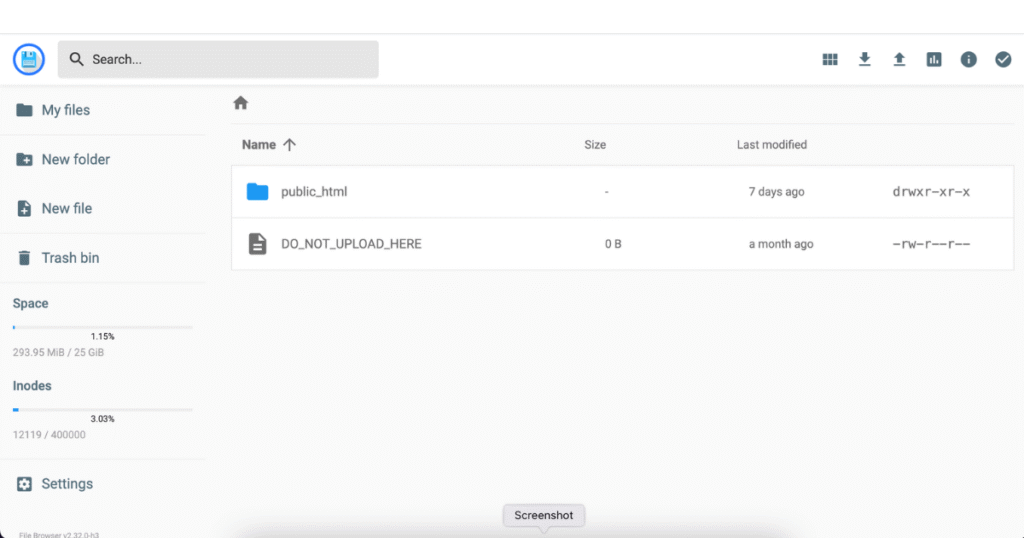
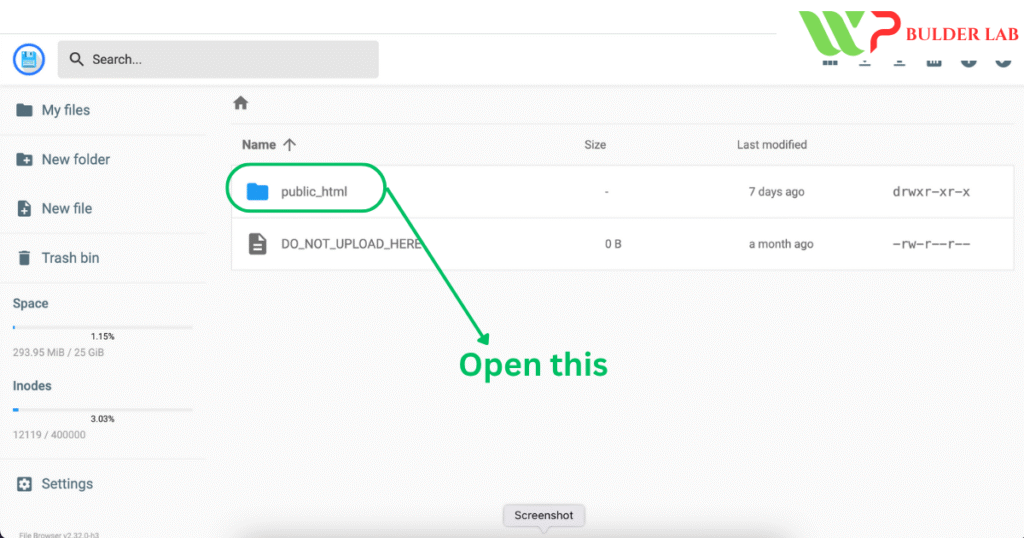
Step 2: Navigate to the Public HTML Folder
Once inside the File Manager, look for a folder named public_html. This folder contains all of your website’s core files.
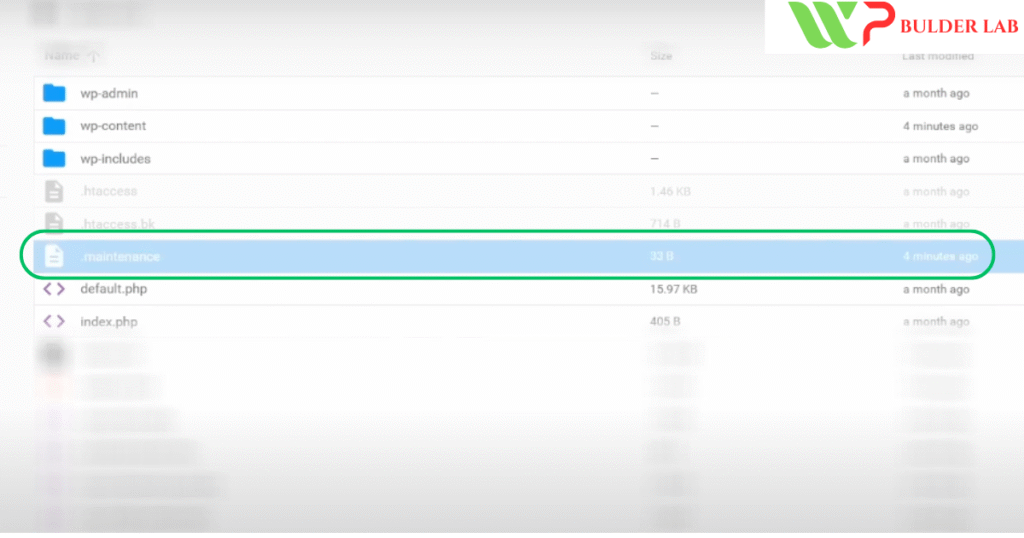
In the public_html directory, you’ll see a hidden file named .maintenance. This file is automatically created when WordPress enters maintenance mode—and it’s supposed to delete itself after the update is complete. But if the update gets stuck or interrupted, the file remains there and keeps your site stuck in maintenance mode.
Right-click on the .maintenance file and choose Delete.
Confirm the deletion if prompted.
That’s it! You’ve removed the file that was causing the problem.
Step 4: Refresh Your Website
Now go back to your website and refresh the page.
If everything was done correctly, your site should be back to normal and the maintenance message should be gone.
Final Words: Don’t Panic—It’s a Simple Fix
Getting stuck in WordPress maintenance mode might seem like a big problem at first, but it’s actually one of the simplest issues to resolve. This situation usually happens due to a failed or incomplete update, and removing the .maintenance file is often all it takes to get things back on track.
To avoid this in the future:
Don’t close the browser or refresh the page during updates.
Always create a backup before making changes to your site.
Try updating one plugin or theme at a time instead of all at once.
If, for some reason, deleting the .maintenance file doesn’t work—or you can’t find the file at all—you might want to contact your hosting provider’s support team. They can guide you through additional troubleshooting steps.Thanks for following along with this guide! If you have any questions or run into problems, feel free to leave a comment—I’m here to help.
Creating a professional website isn’t just about design — it’s also about building trust with your visitors. One of the most important elements for that trust is a clearly visible Terms and Conditions page. If you’re using Divi 5, adding this legal link to your website footer is much easier than you might think.
In this simple, step-by-step tutorial, we’ll guide you through the entire process — from creating a Terms and Conditions page to placing a clickable link in the Divi 5 footer. Even if you’re a beginner, don’t worry. This guide is made for you, with clear steps and helpful tips to get the job done smoothly.
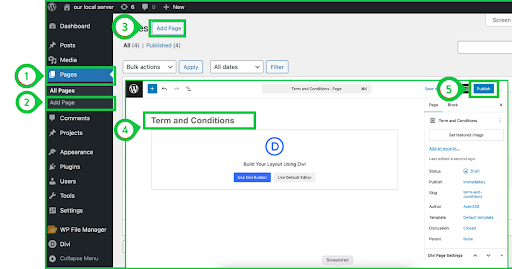
How to Create a Terms and Conditions Page
Before adding the Terms and Conditions to the footer, we’ll first show you how to create a Terms and Conditions page using the latest version of Divi, which is Divi 5. But if you already have a Terms and Conditions page, you can skip this part.
Continuing with the Terms and Conditions page — once you’ve saved the page, open it and start adding your description about the terms and conditions.
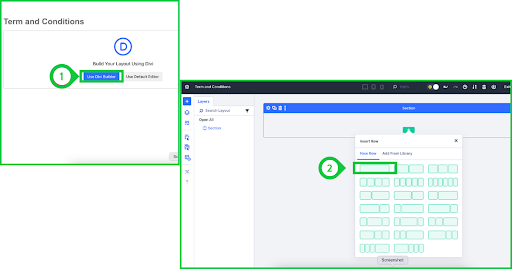
Click on the Use Divi Builder option.
Select a single row with a single column, as shown in the image below.
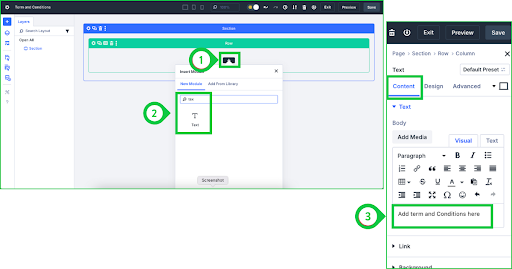
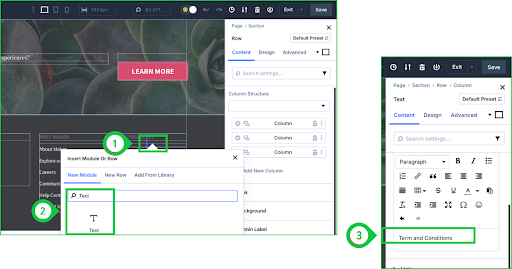
Now, add a Text Module and simply paste your Terms and Conditions description into it. If you don’t know how to write a description, you can use ChatGPT or any other AI tool. Just ask the AI to generate Terms and Conditions for your website by providing your website name, domain, and the purpose of your website. Once you have your ready-made description, follow these steps:
Add a Text Module to the column by searching for Text Module and clicking on it.
As soon as the Text Module is added, its settings popup will automatically open.
Click on the Content tab, paste your description into the text area, then save the settings and exit.
How to Add Terms and Conditions to the Footer Using Divi 5
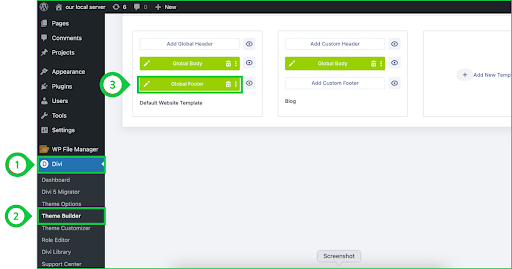
In the previous step, we showed you how to create a page for the Terms and Conditions. Now, we will simply add it to the footer using the Divi 5 Page Builder.
Click on Divi in the WordPress dashboard.
Click on Theme Builder.
Then, click on the Global Footer.
Add Terms and Conditions Link to the Footer
In the above step, we opened the footer in the Divi 5 Builder. Now, as shown in the screenshot below, our footer is open, and we need to add a Text Module for the Terms & Conditions wherever we want it. It’s completely up to you where you want to place it. Just add a row or column in the footer where you want to insert the link.
Click on the Plus (+) icon button.
Search for Text, and the Text Module will appear — click to add it.
In the Text Module’s Content tab, under the Text option, simply write Terms & Conditions.
Change the Text to a Clickable Link
Now that we’ve added the Text Module and written Terms and Conditions, it’s time to turn it into a clickable link.
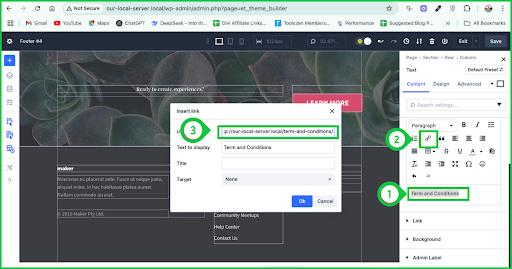
Select all the Terms and Conditions text, as shown in the screenshot below.
Click on the Link button shown in the toolbar (as shown in the screenshot).
Paste the Terms and Conditions page link, then click the OK button to save the link.
Finally, save the changes and exit the footer settings. You will now see the result — it’s simple and works perfectly.
Final Result
The screenshot below shows the final outcome of our hard work. We achieved the result very easily without facing any barriers.
Conclusion
Adding a Terms and Conditions link to your Divi 5 footer is not only important for legal reasons, but it also shows your visitors that your website is trustworthy and transparent. With just a few simple steps, you’ve now learned how to create the page, add content, and insert a clickable link right where it belongs — in your footer.
This process may seem technical at first, but as you’ve seen, it’s actually quite easy using Divi 5’s builder tools. Keep exploring and customizing your website confidently — and if you ever get stuck, remember WP Builder Lab is here to help with simple tutorials just like this!