Creating a professional website isn’t just about design — it’s also about building trust with your visitors. One of the most important elements for that trust is a clearly visible Terms and Conditions page. If you’re using Divi 5, adding this legal link to your website footer is much easier than you might think.
In this simple, step-by-step tutorial, we’ll guide you through the entire process — from creating a Terms and Conditions page to placing a clickable link in the Divi 5 footer. Even if you’re a beginner, don’t worry. This guide is made for you, with clear steps and helpful tips to get the job done smoothly.
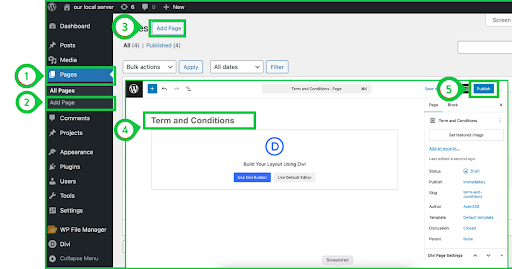
How to Create a Terms and Conditions Page
Before adding the Terms and Conditions to the footer, we’ll first show you how to create a Terms and Conditions page using the latest version of Divi, which is Divi 5. But if you already have a Terms and Conditions page, you can skip this part.
- Click on Pages in the WordPress dashboard.
- Click on Add New or click on All Pages — both options let you create a new page.
- If you selected All Pages, then click on the Add New button as shown in the screenshot below.
- In the Title, write Terms and Conditions.
- Click the Save button to publish the page.
Read More: Best Divi Website Layouts for Photographers – Optimized for Visual Storytelling
Add Terms and Conditions Description
Continuing with the Terms and Conditions page — once you’ve saved the page, open it and start adding your description about the terms and conditions.
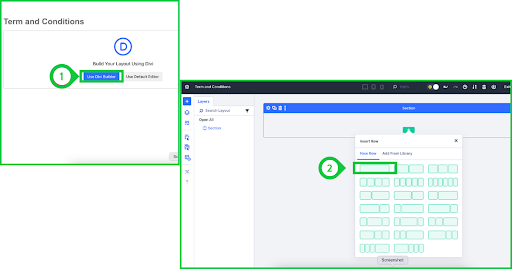
- Click on the Use Divi Builder option.
- Select a single row with a single column, as shown in the image below.
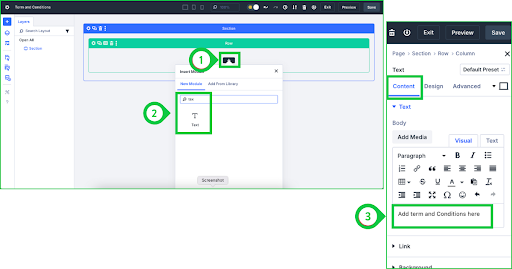
Now, add a Text Module and simply paste your Terms and Conditions description into it. If you don’t know how to write a description, you can use ChatGPT or any other AI tool. Just ask the AI to generate Terms and Conditions for your website by providing your website name, domain, and the purpose of your website. Once you have your ready-made description, follow these steps:
- Add a Text Module to the column by searching for Text Module and clicking on it.
- As soon as the Text Module is added, its settings popup will automatically open.
- Click on the Content tab, paste your description into the text area, then save the settings and exit.
Learn More: Best Divi Landing Page Templates for Mobile Apps
How to Add Terms and Conditions to the Footer Using Divi 5
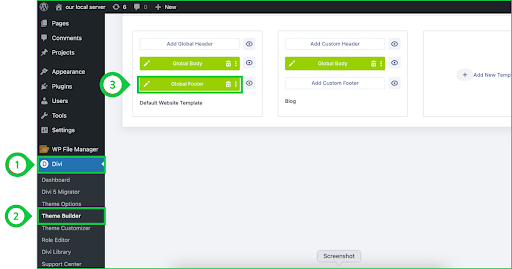
In the previous step, we showed you how to create a page for the Terms and Conditions. Now, we will simply add it to the footer using the Divi 5 Page Builder.
- Click on Divi in the WordPress dashboard.
- Click on Theme Builder.
- Then, click on the Global Footer.
Add Terms and Conditions Link to the Footer
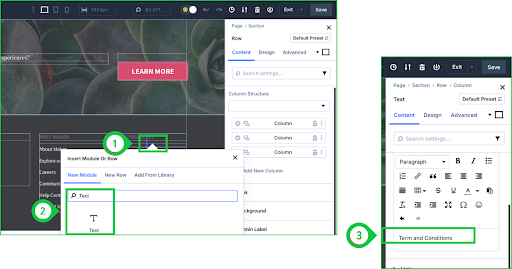
In the above step, we opened the footer in the Divi 5 Builder. Now, as shown in the screenshot below, our footer is open, and we need to add a Text Module for the Terms & Conditions wherever we want it. It’s completely up to you where you want to place it. Just add a row or column in the footer where you want to insert the link.
- Click on the Plus (+) icon button.
- Search for Text, and the Text Module will appear — click to add it.
- In the Text Module’s Content tab, under the Text option, simply write Terms & Conditions.
Change the Text to a Clickable Link
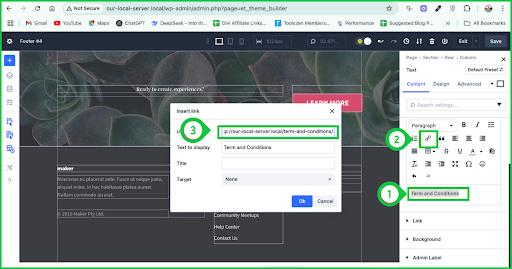
Now that we’ve added the Text Module and written Terms and Conditions, it’s time to turn it into a clickable link.
- Select all the Terms and Conditions text, as shown in the screenshot below.
- Click on the Link button shown in the toolbar (as shown in the screenshot).
- Paste the Terms and Conditions page link, then click the OK button to save the link.
Finally, save the changes and exit the footer settings. You will now see the result — it’s simple and works perfectly.
Final Result
The screenshot below shows the final outcome of our hard work. We achieved the result very easily without facing any barriers.

Conclusion
Adding a Terms and Conditions link to your Divi 5 footer is not only important for legal reasons, but it also shows your visitors that your website is trustworthy and transparent. With just a few simple steps, you’ve now learned how to create the page, add content, and insert a clickable link right where it belongs — in your footer.
This process may seem technical at first, but as you’ve seen, it’s actually quite easy using Divi 5’s builder tools. Keep exploring and customizing your website confidently — and if you ever get stuck, remember WP Builder Lab is here to help with simple tutorials just like this!
Learn More: Divi vs Elementor for WooCommerce: Which Page Builder Is Best for Online Stores in 2025?